


An alternate title for this post could quite appropriately be, “What I Did Over the Holiday Break.” Remember a few months back when I was sharing the latest on the homefront with regards to our master bedroom? Welp, you can safely classify that project under works in progress. One of the biggest stumbling blocks has been finding the right bedside tables. Our bed is quite tall with a rather massive headboard. Our room is relatively small and needing for storage in a major way. Most so-called nighstands are too short to be functional next our bed and anything with too large of a footprint automatically gets nixed because we just don’t have the room to spare. Then about a month ago I stumbled upon this post over at Little House Blog and boom. I had my answer. The IKEA Rast chest all gussied up to look both modern and elegant. Done and done.

So, truth be told, I pretty much copied Lindsay’s IKEA Rast hack with a few very minor changes in paint and stain colors. That wasn’t my intention. I played around with different color and hardware ideas and then you know what? I opted to not fix something that wasn’t broken. Lindsay’s piece was perfect for our room. The IKEA Rast 3-drawer dressers are a good 27″ tall making them an ideal height for hanging out next to our bed. The depth keeps them from taking up too much floor space, and the the added storage is a huge bonus. Oh, and did I mention the dressers cost just $34 each? Uh, yeah. Needless to say, the price was also beyond perfect.


- IKEA Rast 3-drawer dresser
- Ring pulls by Lee Valley (51x43mm size in burnished bronze)
- Benjamin Moore Advance paint in Decorator’s White, high gloss
- Sherwin William’s Water-Based Acrylic-Alklyd Primer
- Minwax stain in Dark Walnut
- Minwax Polycrylic in Clear Semi-Gloss
- Howard Feed-n-Wax wood polish
- Fine sand paper
- Brushes, rags, etc.
To kick things off, B and I assembled the IKEA Rast dressers while watching a movie one night. We assembled the drawers but kept them off to the side and skipped the knobs. (I’m showing you one here just to give you a feel for what the originals look like.) The dressers come unfinished, but they’re solid wood and quite sturdy. Definitely a bargain for $34! Then I lightly sanded everything down and cleaned everything up with a damp cloth to remove any dust before beginning.


For the body of the dressers, I did one coat of stain and then let everything dry completely overnight. I love how the wood grain still shows through, but the walnut gives everything a rich look. For the drawers, I first gave the fronts two coats of primer using a small dense roller like I did with our living room end tables. I followed up with one coat of paint, using the same technique with a brush as with the aforementioned end tables, working hard to not mess too much with it to avoid brush marks. Benjamin Moore’s Advance line is thick like an oil-based paint, which allows it to self-level and give a really smooth finish when dry.

After the stain dried over night, I applied two coats of poly, following the instructions on the can and allowing it to dry a few hours between each coat. When all was said and done, I felt like it could use a little bit of something-something so I busted out the Howard Feed-n-Wax, applying it with a soft cloth. The Feed-n-Wax brings a shine and softness to wood that I really like. Usually I apply it liberally, allow it to set for an hour or more and then buff it with a clean cloth. Now the tricky part – I let everything set and dry completely for a good 48 hours before putting the drawers in place and attaching the hardware. Any earlier and you could risk messing up the paint finish so just let things be. Trust me. Speaking from experience over here. Patience is your friend.


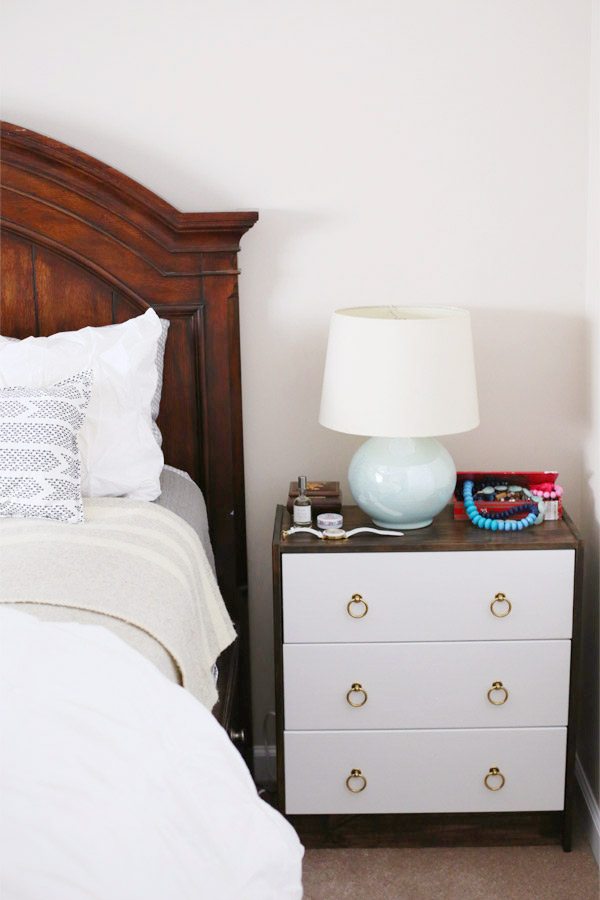
Slowly but surely the bedroom is coming together! (Keeping in mind these photos are completely unstyled and really just a random collection of things I often keep near my side of the bed like my old cigar box spilling over with necklaces.) We now basically just need lamps and drapes. I wasn’t in love with the original curtains I had picked out, because when they showed up they were much more cream than the white they were called and it just didn’t work with our white bedding. Our current lamps are mismatched and wildly different shapes and scales so they just aren’t working for me, although I’ll reuse them elsewhere I’m sure. Other than that we’re in the home stretch of calling this room a wrap. You know, a bazillion months later. So it goes with home decorating! At least in my world.
As for a budget breakdown, I’m estimating I have about $160 into the pair, which includes IKEA’s ridiculous shipping costs seeing as though we’re nowhere near a store. I had the paint, stain, and primer on hand from other projects so I am not including that cost here, but if you had to buy all of that new you might be in it for $220 or so for both dressers. (Minus about $45 in shipping if you live close enough to an IKEA to pick them up.) All in all, a serious bargain for solid wood nightstands that are both functional and pretty gorgeous. I’ll take it!
![]()
[Photos by Cyd Converse for The Sweetest Occasion.]
Sources –
Dressers from IKEA
Hardware from Lee Valley
Stain, poly and Feed-n-Wax from Home Depot
Paint + primer purchased locally
Bed from Raymour & Flanigan (similar)
Duvet + shams from West Elm
Throw pillow shams c/o Scout Mob
Wool blanket from MacAusland’s Woolen Mill
Quilt from HomeGoods
Lamp from Lowe’s (circa 2003)


 Back to Top
Did you let the drawers dry for as long as you did for the side tables (4-5 days)? I want to do the entire dresser in white enamel as a nightstand but don’t know if I can keep pets and others from touching it for that long, and don’t want to leave it outside while I’m at work if I can help it!
Hi P! Yes, I did let the drawers dry that long before attaching the hardware, but that’s not to say that you couldn’t slide the drawers into place, leave them slightly ajar and allow the paint to cure for a few days once they’re dry to the touch. I just didn’t want to be messing with hardware and a screw driver and all of that until the paint was really hardened, otherwise you couldn’t accidentally dent the finish when doing that part of the job. I hope this helps! I think all white would be gorgeous! :-)
Wow you did a great job. Looks classy. I love it. Have you done other ikea hacks? Here are some cool ones to try http://apartmentevolution.wordpress.com/2014/08/06/ikea-hacks-5-to-furnish-your-apartment/
Did you find that the screws that came with the ring pulls were too long? I ordered them from Lee Valley but the pulls don’t sit flush with the drawer.
Hi Michele! The screws that came with my pulls actually were too long, too! I think I forgot to mention that in the post. I’m sorry! I just ended up going to my local hardware store and picking up some washers to make up the extra length and it worked great. I hope this helps! :-)
Did you put the poly on the drawers over the white too or just the wood???
No poly over the paint! It’s two coats of primer and then the paint. Because it’s a high gloss paint that’s akin to oil-based enamel, it should hold up really well. I used the same technique with our living room end tables (https://thesweetestoccasion.com/2013/06/how-to-paint-furniture/) which get a lot more wear and tear and so far they’ve held up perfectly. Personally I wouldn’t use a standard latex paint like that you’d put on your wall for furniture, you need the increased durability of an oil paint or a water-based paint such as Benjamin Moore’s Advance line which is designed to mimic an oil enamel. Hope this helps! :-)
Great example of how to make the most of IKEA furniture with a little creativity. What’s next?
This is one of the BEST IKEA hacks I’ve seen. Truly. I think I need a Rast or four in my life.
Thanks, Heather! I think you do, too ;-)
These look great…and about 150x easier than the Rast Hack I’m doing.
Thanks, Lil! When in doubt I like to keep it simple, I admit I lose patience when things get overly complicated lol Best of luck! xoxo
I also do not live near an IKEA and as such have never made a purchase from there before, but wow, these came out gorgeous. I absolutely love the pulls!
jess | Quaintrelle
It turned out great! Thanks for the motivation to get to work on mine!
A little motivation always helps me, too, Courtney! Good luck, you’ll love them :-)
That’s totally beautiful, I love it! Very classy.