


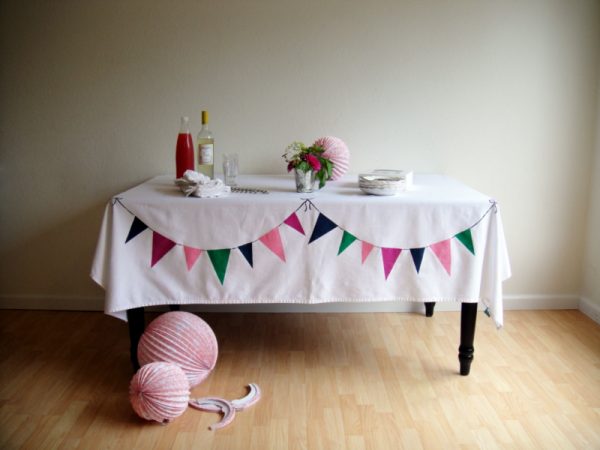
Hi, it’s Jenny from Hank + Hunt, with yes, more garland to share! Sort of. This DIY project is the most fun I have had in a long time. Seriously, when was the last time you painted fabric? T-shirts at a slumber party in fourth grade? Yes? Ok, so the t-shirts turned out badly, but the fun was incredible, right? Think about if you made something cool…like this bunting tablecloth. This tablecloth is easy, will last forever, and is insanely cheap. Yep, you don’t even have to buy a screenprinting kit to do it. I tried to use things I had around the house, because you can get your craft on with out breaking the bank.
Supplies –
- Fabric paint (I used Tulip Soft Paint)
- Tablecloth
- Stick-on measuring tape (at a yardage shop like Joanns)
- Twine
- Temporary fabric pen (disappears with water)
- Sponge
- Scotch Tape
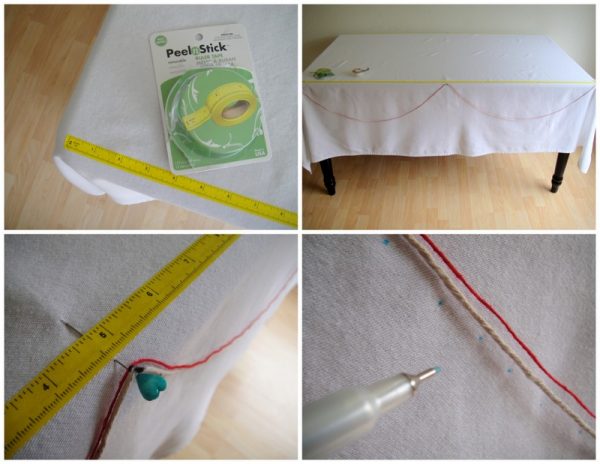
Send your tablecloth through the laundry, and iron. Really, I just got a white table cloth from Target. (You can’t beat the $17 price tag.) Center the tablecloth on the table it will be used on. Line each edge of the long side of the table with the stick-on measuring tape. This was a trick I used to make sure I had my pattern centered on the table after I moved around to make the design. Cut a piece of twine, about 6 inches longer than the table, tape one edge down. Adjust the length of the twine to give it a soft curve. Remember: there will be flags under this line. To create a double curve, use a straight pin dead center and hang the twine on top. Tape the second end down and mark the string so you can do the same length on the opposite side. Trace the line with the fabric pen. I used dots so it didn’t disrupt the twine as it was hanging. (Note: You don’t have to use two colors of twine, I just added the red so you could see it in the pictures.) Repeat these steps for all four sides.
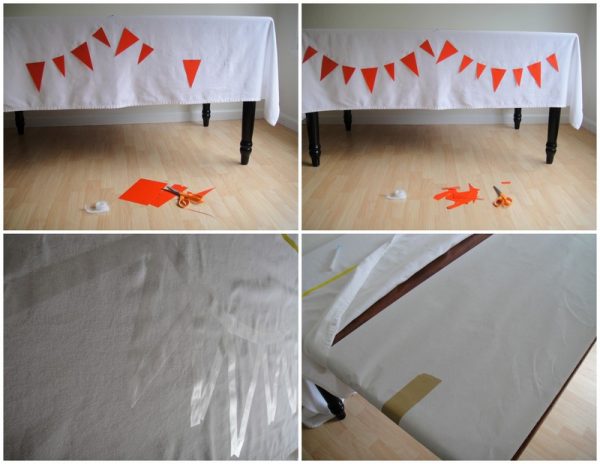
Using cardstock, cut some flags and tape along the dotted line. I used alternating sizes, but it would be just as pretty if they were all the same. Finish the entire side. I took a picture to see if I liked it and modified spacing, etc. Pull the side of the tablecloth up to the tabletop. Trace each flag with strips of tape. Any other kind of masking tape would work here, too. Be sure to smooth all the edges so paint doesn’t leak under the line. Cover your table top with freezer paper or plastic wrap to protect it from the paint.

Cut your sponge into strips. (I just used a regular kitchen sponge.) Using a plate as a paint palette, lightly dab the paint on each flag, being careful to keep it inside the tape lines. Let dry for 15 minutes, and add a second coat if you want. Let dry to the touch, and carefully do the other sides.
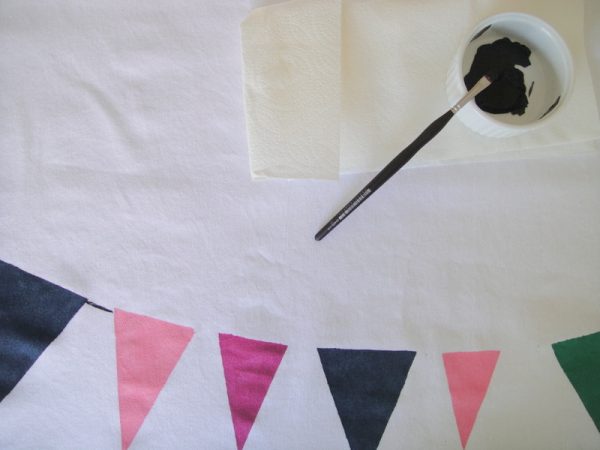
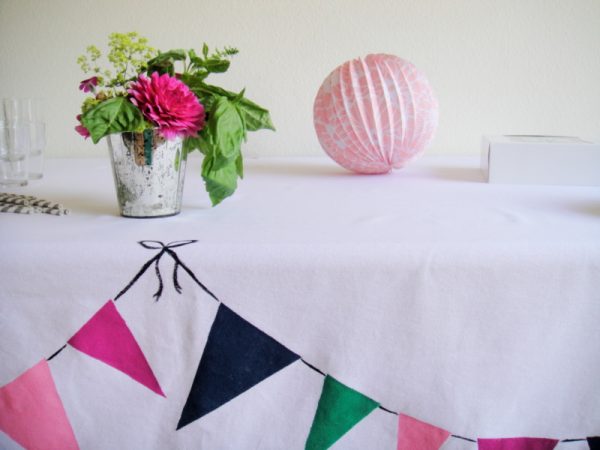
Once all your sides are fully dry (I let mine go overnight, but it only takes about 3 or 4 hours), use a small paintbrush and paint on the lines, following the dots. Don’t worry about having to completely follow the dots, use them only as a guide, do what fits best with the flags, you could also stitch with embroidery thread here. A light stroke gives it a little vintage flair. I added bows on each side. They really were easy.

For the bows, I used a small slanted brush. Start upside down and paint a pointed oval. Add a second oval. Let the brush do the work and make the top of the ovals wider, like old bows on advertising from the 50’s. Add some wiggly lines on the bottom for the ties. Now face the bow head on, and just smooth out and pretty up your bow. Easy peasy! I added these at each place the bunting “attaches” to the tablecloth.
Let dry completely according to the paint’s directions. Wash. Dry. Party.
I just can’t tell you enough how fun this was. How perfect is this for impromptu gatherings? I am going to make this in so many versions, a boy version, a taupe linen version with silver flags and ties, a black tablecloth with white flags, and even a modified patchwork, with iron on flags out of fabric. A simple little tablecloth that will last through decades of happy little celebrations!

{Photos by Hank + Hunt for The Sweetest Occasion.}


 Back to Top
I absolutely love this!
.-= Juliet’s most recent blog post: Boy =-.
Such a fun idea! And I never knew that there was such a thing as a stick-on measuring tape. Of course, when I think about it, it makes perfect sense. So ingenious! Thanks for enlightening me and enticing me with this cute tablecloth.
.-= Linda at Circular Needles’s most recent blog post: A Pleasant Surprise =-.
I can’t wait to try this! No hanging fabric in the house shall escape my paintbrush!
.-= Mrs Crumpet’s most recent blog post: Arty Pants: David Goldblatt =-.
Ohhh how lovely!! I am definitely doing this for my patio table.. no special event needed :) Thanks for sharing!
.-= Karla’s most recent blog post: Special Announcement: A friend’s giveaway! "ThePinkGiraffe" =-.
Genius! Love the pretty colours – and those ribbons are perfect!
.-= Sheralyn’s most recent blog post: DIY Wedding Photobooth & Photoline =-.
What an awesome idea! Not sure I’ll be using it for my wedding but it would be perfect for a birthday party!! Thanks for sharing!
.-= Laura’s most recent blog post: Our First Engagement Shoot =-.
Jenny, LOVE this idea. Oh my goodness, I must try this!
I can’t bookmark this fast enough, LOVE IT.
This is perfect – cute, clever and reusable! Thanks for sharing!
.-= Susan @busybeelifestyle.com’s most recent blog post: Mini Decorating Trend {Chevron Stripes} =-.
What a cute idea…I would love to make one in rainbow colors to use for birthdays!
.-= Andrea @ Strawberry-Chic’s most recent blog post: Something Sweet: Smores =-.
Such a great idea!!!! Genius!!
.-= Brancoprata’s most recent blog post: Bolo de Casamento = Wedding Cake =-.
This is such an adorable idea and looks very simple to make! Thank you for the idea!
.-= Ambrya’s most recent blog post: Promo Party at Westside Park =-.
So, so brilliant, Jenny! Thanks for this one.
Love this idea! So cute and perfect!
very very cute! thanks for sharing!
Um, I am officially obsessed with this! Thanks so much for the great DIY idea!
.-= chandra ~ oh lovely day’s most recent blog post: {Real Engagement} Tracy & Jim: Love Over Coffee + A Stop Motion Save the Date =-.