
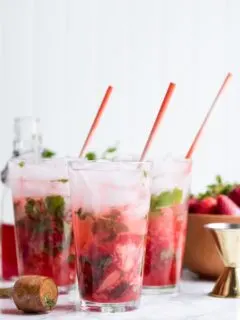
This fruity and refreshing strawberry mojito is the perfect summer cocktail. Made with homemade strawberry simple syrup, this is the ultimate strawberry mojito recipe.

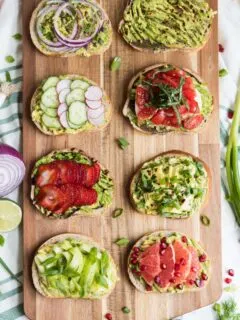
It’s Monday morning following an ice storm over the weekend, so the start to my week is looking a whole lot like big cups of coffee, sheltering in place for another 24 hours, and if I’m lucky, some extra snuggles with my kid. (And yes, it’s mid-April and we’re encased in ice.) While the little one sits next to me, armed with a stash of crayons and her favorite coloring book, let’s talk about avocado toast! I know, I know. There’s nothing revolutionary about avocado toast, which is becoming such a mainstay these days that it’s basically ubiquitous. But here’s the thing. We can’t stop eating it! When you have a two year old who is obsessed with avocados and her parents echo those sentiments, well, you buy a lot of avocados. Bob prefers his with tomatoes on top and a big pinch of coarse ground salt. If I’m keeping it simple, I like mine with a generous sprinkle of red pepper flake. If I’m keeping it real though, I love my avocado toast piled high with veggies and herbs and a little bit of interest to keep it fun. Today I’m sharing eight awesome ways to make the best avocado toast on earth. This certainly isn’t the first avocado toast round-up you’ve seen and I bet it won’t be the last, but I can guarantee all of these varieties are crazy delicious. What’s your favorite way to eat it? I have a kitchen full of avocados and marble rye bread and I’m ready to go!


I’m a really big fan of simple ingredients that are perfectly paired together. I also really love potatoes. While those two things may seem completely unrelated, I’m here to tell you otherwise with these super tasty smashed potatoes! Don’t they look kind of fancy? Well they’re not! You just need to be able to boil water and operate your oven at a very minimal level and these beauties can be making your palate happy with just the teensiest amount of effort. They’re topped with fresh lemon juice, Greek yogurt, lemon zest and chives for a flavor combination that is light and refreshing and seriously delicious. I love these as a party appetizer! You can line them up on a tray so friends can just grab them and bite right in! Or they’d also make a great side to a weeknight or weekend dinner. I like boiling up a bunch of potatoes and then just smashing and baking off a few at a time during the week for breakfast or dinner. So good! And that, friends, is my ode to smashed potatoes. Try these! You’ll love them.

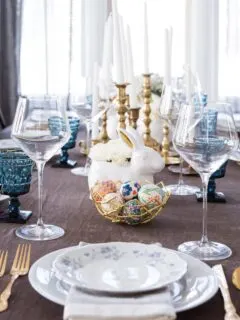
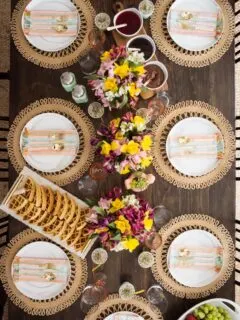
Easter is tomorrow, which doesn’t hardly seem possible, so I’m coming in hot at the last second with some last minute inspiration for your Easter dinner table! (Or your Easter brunch table for that matter.) I teamed up with my friend Briana of Pretty Little Vintage Co. to blend pieces from her amazing collection of vintage finds with basics I already had to create a modern, elegant dinner table that feels really chic and celebratory, but didn’t take a huge budget to pull together. (Pro tip! Rentals aren’t just for weddings and formal events. You can and should absolutely consider rentals for things like holiday dinners and parties, too!) Pretty blue floral vintage dessert plates were paired with very inexpensive white dinnerware, layered with cloth napkins and gorgeous vintage gold flatware to create the sweetest mix. Crystal wine glasses (which my mom snagged me as a gift on super clearance a couple years ago) are matched with blue cut glass goblets, and a field of mismatched brass candlesticks serves as the simplest of centerpieces. All in all, it’s a look that skips Easter pastels in exchange for a touch of elegance that would also serve perfectly for any dinner party.


As a kid Easter was always one of my favorite holidays! (Actually, as a grown up it still is!) I loved that I got a cute new Easter dress every year, I loved waking up to a basket stuffed full of goodies, but mostly I loved decorating eggs. My mom and my aunts would often get us together with our cousins to spend an afternoon coloring eggs a few days before Easter so they could be whisked off and hidden in the middle of the night by the Easter Bunny. Over this past weekend, Em and I did the same, inviting her cousins over for a fun-filled day of Easter glee! Now that she’s a little older, it’s so much fun to begin passing down these traditions. (I should note that she’s not actually in a single one of these photos though because she wasn’t having it. Two years old with a mind of her own!) Today I’m teaming up with Walmart to share all the details of our little egg decorating party with you! From the snacks to the decor to all the Easter goodies you see here, including all the kids’ cute outfits, you can snag everything at Walmart in one quick shopping trip and throw together your very own party. Let’s hop to it!


A few of my girlfriends and I have been talking about starting a book club, but as busy working moms, it just hasn’t seemed to happen. Getting it together enough to read an assigned book in a set timeframe? It’s something that seems completely daunting, even for those of us who absolutely love to read. The solution? A modern twist on a book club party, one that is much more relaxed and takes the pressure off entirely. This isn’t your mother’s book club, friends! It’s much more fun, there’s champagne and thanks to a little inspiration from the P-touch Embellish Ribbon and Tape Printer, there are super cute details that will make your friends excited to dive into a good book!
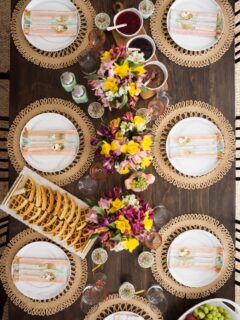
Now that spring is finally here (at least officially), let’s talk brunch! It seems that there are so many brunch-worthy occasions over the spring months between Easter, Mother’s Day, bridal showers and just the joy of sunshine and birds chirping, so I couldn’t resist pulling together a fresh and colorful spring brunch table to share with you. As I was deciding on the color palette and other pieces, I was inspired by the P-touch Embellish Ribbon and Tape Printer to create a few sweet little details to really bring things to life. I also picked up big bunches of alstroemeria and daffodils at the grocery store and tucked them into pretty planters, then layered marble patterned plates with jute chargers, the prettiest peach and gold flatware, and colorful napkins to make things feel special and festive, without involving a ton of prep work. Brunch is about coming together with people you love to share an hour or two of food, mimosas and laughter, not about spending hours stressing out over setting the table. You can work with the pieces you already own, layer in a few touches created with the P-touch Embellish and you’ll have the perfect brunch table set and ready to go when friends arrive!

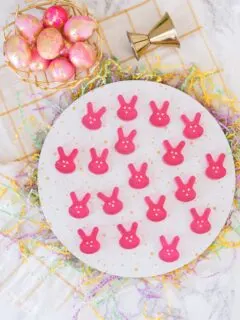
Friends, did you know that my birthday falls on Easter this year? Ok, I didn’t really think anyone was tracking that so guess what? My birthday is on Easter this year! That’s never happened before, but it feels kind of fun, so since I’m a grown adult (turning the big 3-5 no less), it seems only appropriate that there be some kind of booze involved. Cut to me walking through Michaels and spying the cutest little silicone bunny molds and, welp, we’ve got these boozy bunny jiggler shots! They’re made with rosé, raspberry vodka and strawberry simple syrup so the result is super fruity and equally festive! Keep reading for the recipe, and click through to check out a few of my blogging buds and their festive Easter creations, too! My friends know how to celebrate and I’m crazy for all their recipes and decor ideas.

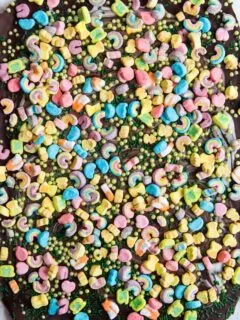
Well, friends, I am certifiably obsessed with making bark. If that wasn’t already self-evident, here’s another chocolate bark recipe, loaded with Lucky Charms and sprinkles just in time for St. Patrick’s Day! Why do I love bark so much? In short, it’s incredibly easy and really fun to make. It’s such a sweet, simple novelty and people go crazy for it whenever I make a fresh batch. Our kids love to help sprinkle the toppings and after I make a big batch (if it’s not specifically for a party), I just tuck it into an airtight container in the fridge where it keeps for a couple of weeks without a problem. You can divvy it up into little cello bags for gifting to co-workers or neighbors, or send it to school for a special St. Patrick’s Day treat for the little leprechauns in your life! Basically, it’s inexpensive and quick to make, so you don’t have to plan it out days in advance, and you can switch up the flavors and colors however you want. Have I made the case for bark yet? If you haven’t given one of my many bark concoctions a try yet, there’s no time like the present! I promise you’ll be hooked.


A few weeks ago marked Em’s inaugural plane flight when we flew to Florida to visit her baby cousin Marley. I was a little worried about the trip because our girl (who is now a few months over two years old) is a mover and a shaker. She’s not a big fan of sitting still for any real length of time and she’s known to be a little feisty. (I’m mean, there’s a reason why her nickname is Felicia. Yes, that’s a real thing.) I wasn’t so much worried about the flights themselves as I was about the down time in airports, but the flight time was obviously a concern, too. To prepare for our trip I sent out a blast on my personal Facebook page asking all of my toddler parent friends to serve me up their best tips for traveling with toddlers. Luckily, they delivered en masse. We put a bunch of their tips to the test and overall (despite some serious travel delays), we survived the trip relatively unscathed and feel mostly prepared for our next trip whenever it may be. When we knew we were having a baby, we adopted a “have baby, will travel” policy. Sure, it can be easier said than done, but it’s really important to us that our little sidekick join us on lots of adventures, near and far, so the timing now is perfect to get us all in the swing of things, especially since many of her cousins live out of state. Here are some of the best tips that were shared by friends and what worked for us, including links to some of the best toddler travel gear ever made! (A resounding endorsement if ever there was one.)


Admittedly, making chocolate bark is becoming a bit of a thing around here. It started with Halloween candy bark, then Christmas bark in a bunch of varieties, Easter candy bark and here we are today with conversation heart chocolate bark just in time for Valentine’s Day! If you need a last minute treat for your kids to bring along to school or you want to whip up something sweet for your co-workers, this is the ticket! Here’s the thing though – chocolate bark is so easy to make. Seriously! If you can boil water, you can make bark. The key is to melt the chocolate over a double boiler. I don’t have an “official” double boiler so I use a stock pot with water and then a heat-safe glass mixing bowl sitting on top of the stock pot and it works great. (Check out my “Behind the Blog” Instagram Stories highlights to see what I mean!) I made my bark with dark chocolate with a white chocolate swirl, but you can really use any chocolate you like. Other than that it’s just conversation hearts and pink heart sprinkles, which also aren’t strictly necessary if you can’t find any. Personally I just love bark, because people find it to be such a novelty and it’s easy enough that if you don’t prefer to bake or you have kids you want to have help you with sprinkling the toppings, you’re good to go. Give it a try!

Has anyone else noticed that since buying our house going on two years ago I’ve never talked about the bedrooms? It’s true! This is the part where I’ll now admit that we’ve done nothing to the bedrooms in the entire time we’ve owned the house. We dumped our existing furniture into the rooms, we tossed our clothes in drawers and closets and that is all that has happened. Not one wall has been painted, not a single curtain has been hung. I guess it’s just a side effect of jumping feet first, head first and life first into a whole home renovation. The bedrooms just haven’t felt that important, or the upstairs at all for that matter since we haven’t touched anything up there. Ok, actually, we still have most of the rooms in the house left to renovate and I’m getting a little crazy right now thinking about the long list of everything left to tackle. The master bedroom though? It is time. It’s high past time truthfully. I am finally at a point where I feel like I really want and even need our bedroom to be settled and a place of respite at the end of a long day. The trick? By modern standards, and certainly in comparison to the size of our house overall, our master bedroom is tiny! It clocks in at just roughly 13′ by 12′ so things like loads of storage and luxurious king size beds aren’t in the cards for us. I have been searching around for loads of small master bedroom ideas though and today I’m sharing a bit of my design plan as we move forward!